
I have been building for the last few years almost all the scale reproductions airplanes with a fuselage structure made with welded tubes.
The first airplane I built using such technique was the Fieseler Storch.
Not only I like them very much, but these structures are incredibly light and strong, (see the article about the Piper Cub). Also they are very quick to build.
The materials
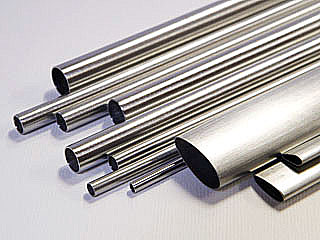
The material I normally use is a stainless steel tube in various diameter sizes, ranging from 3 to 9 mm (0,118” to 0,354”), having a thickness of 0,25mm (0,01”) or 0,5mm (0,02”) for the most stressed out parts.
I use 30% silver alloy bars for welding. It’s sufficient to use a GPL or Butan gas welding pipe, you can find also some pipes that work with the cigarette lighter type of gas, in this case they don’t last long.
Even an oxygen type of pipe is ok, however I recommend to keep the flame very low and at a certain distance because it’s very powerful and , if the stainless steel overheats and turns black can not be welded.
Anyway a slight blackening of the tube is normal.
The welding technique.
The gas pipe, which has a wide flame, is good to weld the tubes together, the oxygen pipe is better for the welding of massive parts and the heat can be concentrated in precise spots
I suggest the beginners to buy only the gas pipe.

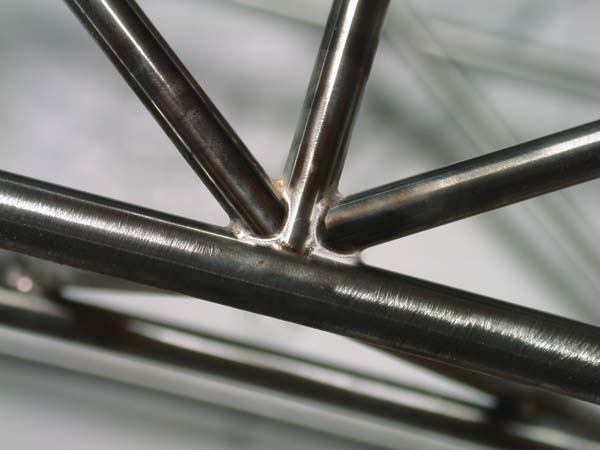
The tubes must be prepared so to fit very closely with each other, using a round file to make a groove in the tubes that will be welded end to end, small cracks can be filled with the welding alloy.
After positioning the two tubes, the tip of the welding bar has to be slightly preheated and it’s layed at the tubes crossing, and heated until it melts.
When the welding alloy starts to melt make sure that flows where you want to, keep in mind that the welding alloy flows towards the hotter parts, therefore it’s sufficient to heat ahead of it so as to guide it to the required point.
It sounds easy but it needs some practice.
I suggest to practice with some tube scraps before making the final weldings.
As a general rule keep in mind that if you have to weld two tubes or plates of different thickness the flame has to be on the side of the thicker object so to heat this first. You can use the welding bar to protect from the flame the part that don’t want to be heated .
Don’t be in a hurry but don’t dwell too much on the same spot, oxidation is waiting to happen.
If the tube becomes incandescent then oxidizes, so when you see the tube that starts turning red lower the flame and move it away from it.
To go over a welding, add some welding alloy drops in the cracks or to fill holes, wait until the welding cools down , then soften the bar tip using the flame and lay the bar on the point to be rewelded moving the flame away often and dwelling at the right time, otherwise you may melt the first welding.
Fuselage construction
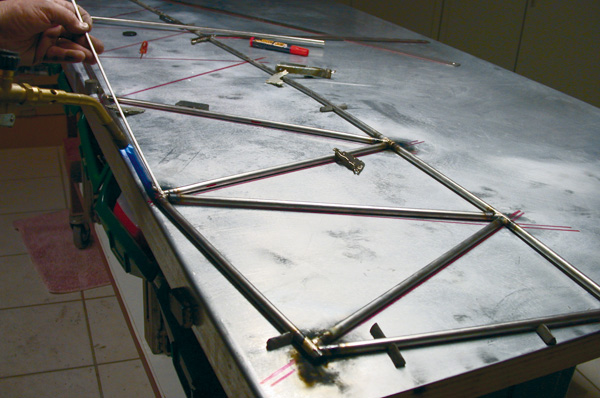
I have found out that an iron made working table is very suitable for the job. My table is a 2mm galvanized iron sheet (picture below) measuring 2x1mt with the long sides bent at 90° for 4 cm, resting on a wooden table.
I start building a fuselage outlining with a marker the structure on the metal sheet, then I line up the tubes blocking them in position with strong magnets that I retrieved from old computers hard disks.
At this stage I begin welding, starting from the plane nose towards the tail. It’s important to proceed in subsequent steps because the tube tends to expand and must be left free to stretch out towards the tail. The second side must be built aligned with the first one so as to have two sides exactly the same. Having done that the two sides must be aligned with each other using some reference points on the table , magnets and right angle squares. The first cross braces and diagonals will then be welded paying lot of attention to the alignment, as the work goes on it will be easier and easier.
Usually it takes me a day to frame up a fuselage. Appropriate stainless steel plates will then be attached to the structure for the motor mount, the landing gear, the wing, the wire cabana struts (on the biplane), etc., these details vary depending on the model.
Other steel components
Many planes had also steel tailplane, some had the ribs made with small tubes (see Bucker) , others with bent plates (see RO41). The landing gear is another component that most of the times is made with stainless steel tubes, I always try to copy the full scale landing gear, shock absorbers included, using chromemolibdenium tubes (1).
Residues removal and painting
Once finished, the structures will have to be carefully cleaned from the antioxidant, which usually tends to leave very resistant glass residues.
They can be removed with sand paper, small files and some patience or, as I do, using some residues remover in an acid gel form., you can find it in workshops specialized in welding.
You can also leave the structures unpainted, being in stainless steel it will not be a problem. I often have them painted with epoxidic paint, but it’s only matter of taste.
Covering
Usually a framed style fuselage is covered with fabric in the tail area and aluminum in the front. You will find these techniques explained in my articles especially in the Piper Cub instruction manual, which is covered with Solartex, I suggest also to use the Dacron (1), it’s more difficult but it’s worth the effort.
1) The same used on the real airplanes.